A friend of mine ask: "Is there a Membership System that can be integrated with any POS System?". I've thought: What if I could build one?
So I'm going to start the development of this system. Here's some basic features I will be developing first:
- Membership data collection
- Member's purchase history
Note
This post is intended as a demo of development / coding using Laravel 8. Bunch of technical terms are in used.
1 - Technical Specification
The core application functionality will be developed on Laravel (Version 8 released on 8th September 2020), along with ReactJS for the frontend user interface (UI).
Other specifications include:
- PHP 7.4
- MySQL Database 5.7
- Apache 2.4
- Linux OS (Ubuntu 20.04)
- NodeJS
2 - Setup New Project
Let's first create a database named "membership". Login to mysql and enter password.
    mysql -u root -p
    Enter password:
Note
I'm using root as my database username.
Once entered MySQL service, run the following command to create the database.
mysql> create database membership;
The following message will appear.
Query OK, 1 row is affected (0.01 sec)
Exit the mysql service and back to shell.
Create new Laravel project with Composer
Let's use Composer to create new Laravel project.
Run the following command to automatically create a "membership" directory, and install the necessary dependencies.
composer create-project laravel/laravel --prefer-dist membership
The basic Laravel installation only includes basic backend setup. Since we'll be using ReactJS, let's install laravel/ui package that has the ReactJS boilerplate included.
composer require laravel/ui
Note
laravel/ui package comes with few boilerplate of famous frontend frameworks: ReactJS, VueJS, Bootstrap and TailwindCSS.
Let's generate the ReactJS boilerplate.
    php artisan ui react --auth
    npm install
Note
laravel/ui comes with authentication module as well. The auth flag is used to generate the authentication module.
Explanation:
npmis Node Package Manager, which runs on the NodeJS engine.npm installwill run the installation of the required node packages for the frontend.
Configuration
Installation completed! Let's configure our project in the .env file (duplicate from .env.example).
    // .env
    APP_NAME="Membership System"
    //...
    DB_DATABASE=membership
    DB_USERNAME={your-db-username}
    DB_PASSWORD={your-db-password}
Explanation:
- The .env file is used to store the environment-specific configuration.
- It contains the sensitive information includes the database username and password for the application.
Note
Never commit the .env file into the Git, as it stores the sensitive information that should not be shared with others.
We're done setting up the project, ready to go next!
3 - Member Data Model
Let's define our first Model – Member. We assume each member to have these information:
- Name
- Contact Number
We'll need to create a DB table "members" to store these information. Let's use Artisan command to generate the database migration script.
php artisan make:migration create_members_table --table=members
Explanation:
- Using the flag
--table=membersin the command to directly include table name into the Schemaup()anddown()function. - The command will generate a new file in database/migrations/xxxx_create_members_table, where xxxx is the timestamp of when it's being generated.
Note
Laravel provides Artisan command and it's pretty neat and convenient for developer to generate the Laravel functionality.
Let's start writing our first schema.
    /* database/migrations/xxxx_create_members_table.php */
    public function up()
    {
        Schema::create('members', function (Blueprint $table) {
            $table->id();
            $table->timestamps();
            $table->string('name');
            $table->string('contact_number')->nullable();
            $table->string('email')->nullable();
            $table->dateTime('joined_date');
            $table->dateTime('expiry_date');
        });
    }
Explanation:
- The
up()function will be called when we execute the migration. It's defined to create a new "members" DB table, with the table column defined within the function. - Note that we've used
id(), timestamps(), string(), dateTime()to define each column type. Refer to full documentation on Laravel for all available column types.
The down() method should be automatically defined when we generate the migration script with flag --table=members in the Artisan command above. It's used to drop the table when we rollback.
Note that I've also added joined_date and expiry_date column to capture the date and time of when the member joined, and when the membership is going to be expired.
We've done defining our first database migration script. Let's run the migration:
    php artisan migrate
    Migrating: xxxx_create_members_table
    Migrated: xxxx_create_members_table (123.45ms)
The table should be created in our "membership" database that we've created earlier.
Quick Verification
We can quickly verify by logging in back to MySQL and check:
    shell> mysql -u root -p
    mysql> use membership;
    Database changed
Enter the following command to list down the tables:
mysql> show tables;
We shall see the "members" in the table list.
    +----------------------+
    | Tables_in_membership |
    +----------------------+
    | failed_jobs          |
    | members              |
    | migrations           |
    | password_resets      |
    | users                |
    +----------------------+
4 – Model/View/Controller (MVC) and Route
A simple understanding about MVC in layman terms:
- Model - The data structure
- View - The frontend, or what we see (HTML)
- Controller - The handler to pass data to the view
- Route - The URL to the controller
Learn it by doing it. Let's start our practice.
We'll need to create a couple of UI pages to allow users' interaction within the system:
- Member Creation Page
- Member Detail Page
- Members Listing Page
Member Creation Page
Let's define the URL to this page. We'll use https://www.example.com/members/create.
Note
We're using www.example.com as an example domain, it can replaced by any other domain.
    /* routes/web.php */
    Route::get('members/create', 'MemberController@create')->name('members.create');
    Route::post('members', 'MemberController@store')->name('members.store');
Explanation:
name('members.create')andname('members.store')are giving the name to the routes, based on the Laravel Resource Controller naming convention.- Note that we have also defined the route for the POST method, which will be calling the controller
store()when user submit the form.
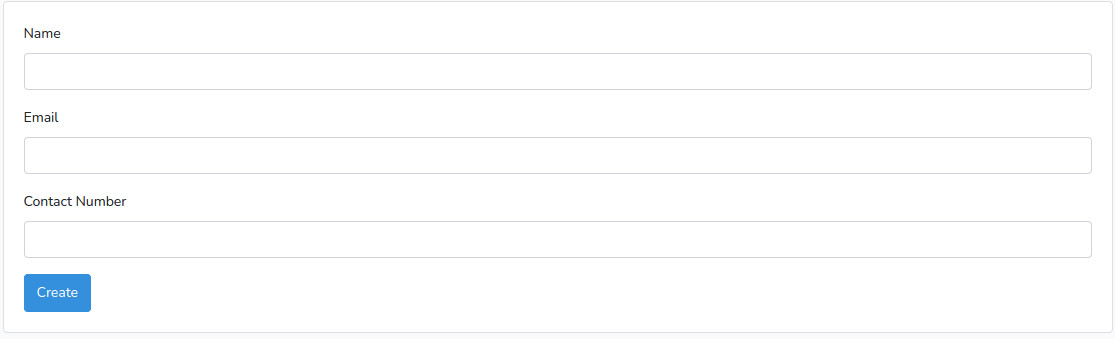
Now we'll create a new members/create.blade.php file - the View.
This page will be a form page, which will consist of 3 input fields that correspond to the 3 member's information as defined earlier.
- Name
- Contact Number
Note
laravel/ui also install Bootstrap when we generate the frontend boilerplate earlier. We'll be using Bootstrap for the UI styling of our UI.
    <!-- resources/views/members/create.blade.php -->
    <form action="{{ route('members.store') }}" method="post">
        @csrf
        <div class="form-group">
            <label for="name">Name</label>
            <input type="text" class="form-control" id="name" name="name">
        </div>
        <div class="form-group">
            <label for="email">Email</label>
            <input type="email" class="form-control" id="email" name="email">
        </div>
        <div class="form-group">
            <label for="contactNumber">Contact Number</label>
            <input type="text" class="form-control" id="contactNumber" name="contact_number">
        </div>
        <button type="submit" class="btn btn-primary">Create</button>
    </form>
Explanation:
{{ route('members.store') }}is the route name to the Member Controller as defined earlier.@csrfis Cross Site Request Forgery, used to protect the form from being submitted by non-authorised external domain.
Now, let's create a controller by using Artisan command.
php artisan make:controller MemberController --model=Member
Note
With the flag --model=Member in the command, it creates the controller as a Resource Controller, and the Member model will be included automatically.
The command will create a new file at app/Http/Controllers/MemberController.php.
Let's define the create function.
    /* app/Http/Controllers/MemberController.php */
    public function create()
    {
        return view('members.create');
    }
Explanation:
- This is a simple function that only need to render a static HTML with form.
- The
returnof this function is calling theviewhelper to render the members/create.blade.php.
We'll need another controller to handle the POST request when user submit the creation form. Let's define the store function.
    /* app/Http/Controllers/MemberController.php */
    public function store(Request $request)
    {
        $member = Member::create($request->all());
        return redirect()->route('members.show');
    }
Explanation:
Member::create($request->all())directly inserts the POST request data$request->all()into database.- This function does not return any view. Instead, it redirects user to the Member Detail page after member is created.
Note
The method above require the Member model to have the 3 data fields to be fillable. Let's define the $fillable in the model.
    /* app/Models/Member.php */
    class Member extends Model
    {
        //...
        protected $fillable = [
            'name',
            'email',
            'contact_number',
        ];
        //...
    }
Now we can create a member into database using the form by navigating to the URL https://www.example.com/members/create.
Note
After submission, you will face error 404 because the route route('members.show') is not setup yet.

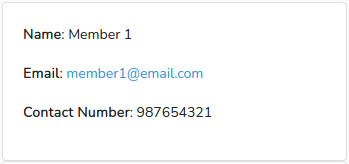
Member Detail Page
This is a page to layout the member's detail information.
Let's use https://www.example.com/members/{id}, where the {id} is the id of the member in the database.
Example: https://www.example.com/members/1 will render the detail of member with id=1.
    /* routes/web.php */
    Route::get('members/{member}', 'MemberController@show')->name('members.show');
Let's create a new members/show.blade.php file.
    <!-- resources/views/members/show.blade.php -->
    <div class="card">
        <div class="card-body">
            <h2>{{ $member->name }}</h2>
            <p>Email: {{ $member->email }}</p>
            <p>Contact Number: {{ $member->contact_number }}</p>
        </div>
    </div>
The blade file require us to pass $member variable into the view. Let's define the show controller function.
    /* app/Http/Controllers/MemberController.php */
    public function show(Member $member)
    {
        return view('members.show')
            ->with([
                'member' => $member,
            ]);
    }
Explanation:
- The controller is using the parameter
{member}defined in the route. - The
Member $membertype-hint the variable$memberto the Member model. - With the type-hint variable, we don't have to manually write
$member = Member::find($id);to retrieve for the member again.
We can now refresh the page to see the member detail page.
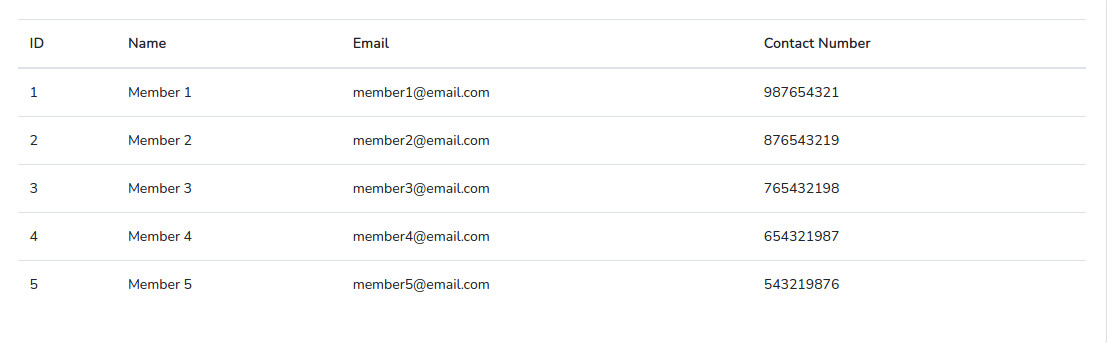
Members Listing Page
We'll also need a page to list down all the members available in the record. Let's use https://www.example.com/members to show the listing page.
    /* routes/web.php */
    Route::get('members', 'MemberController@index')->name('members.index');
Let's create a new members/index.blade.php.
    <!-- resources/views/members/index.blade.php -->
    <table class="table">
        <thead>
            <tr>
                <th>ID</th>
                <th>Name</th>
                <th>Email</th>
                <th>Contact Number</th>
            </tr>
        </thead>
        <tbody>
            @foreach($members as $member)
                <tr>
                    <td>{{ $member->id }}</td>
                    <td>{{ $member->name }}</td>
                    <td>{{ $member->email }}</td>
                    <td>{{ $member->contact_number }}</td>
                </tr>
            @endforeach
        </tbody>
    </table>
Now let's define the function to the listing page index().
    /* app/Http/Controllers/MemberController.php */
    public function index()
    {
        $members = Member::all();

        return view('members.index', [
            'members' => $members,
        ]);
    }
Explanation:
Member::all()retrieves all the members from database.
Note
As personal preference, I like to create new line for each element in the array, and end the last line with comma(,). This is because GIT won't track it as line change when a new element is added to the array in future.
Let's navigate to the https://www.example.com/members to see the listing page.
5 - Adapting Laravel Convention
Instead of writing each route explicitly, we can replace all the routes we defined earlier with one simple line Route::resource, which will automatically map to index, create, store, edit, update, destroy function.
    /* routes/web.php */
    Route::resource('members', 'MemberController');
Conclusion
That's pretty much a simple setup of a basic Membership data storage functionality on Laravel 8. The UI's are minimal and plain. We will discuss further on improving the user experience by implementing hints on the form, validation, as well as performance optimisation in upcoming posts.
Next steps...
We'll be developing the transaction history record functionality, and we'll talk about how to use Eloquent ORM to build up the data relationship between the Member and Transaction history.
Next post: Membership System - Transaction History